draw 3d rectangle in powerpoint
Add 3D objects from a local file
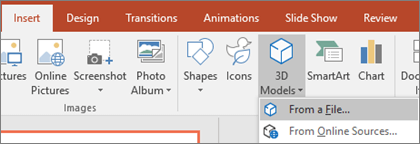
You insert 3D models into your files much the aforementioned way as other images. On the Insert tab of the ribbon select 3D Models and so From a File.
Once it's inserted you lot can use the controls to manipulate the image:
 Utilize the 3D command to rotate or tilt your 3D model in any direction. Just click, hold and drag with your mouse.
 Drag the image handles in or out to make your image larger or smaller.
You tin can however employ the rotation handle  to rotate your image clockwise or counter-clockwise, but y'all'll get a much better feel using the 3D rotation control we talked nigh in a higher place.
Add together 3D Models from our online library
To select a 3D Model from our online library, choose 3D Models > From Online Sources. In the dialog box that appears you can browse, or search for, 3D images from the itemize.
Select one or more than images and click Insert.
Change how your 3D models expect in Office
When you insert a 3D model into your Office file you'll get a contextual tab on the ribbon nether 3D Model Tools called Format. On the format tab in that location are some handy controls to help you lot customize how your 3D images are going to await.
The 3D Model Views gallery gives you a collection of preset views that y'all can utilize on your image. For example you can quickly select the head-on view or the top-down view.
If you've got multiple 3D models and you're having trouble selecting the 1 you want to piece of work with, click the Pick Pane to turn on the listing of objects. Then yous can hands select the image or images that you want to select.
The Marshal tool helps yous place your prototype on the page or slide—at the top or side, for example.
Pan & Zoom gives you lot control of how your 3D epitome fits inside the frame. Click the Pan & Zoom button, then click and drag the object within the frame to movement it. Use the Zoom pointer on the correct-side of the frame to make the object appear larger or smaller inside the frame.
Once you have your 3D images inserted you can do all kinds of exciting things with them, such equally using PowerPoint's Morph Transition to brand the object appear to rotate or spin.
Transport 3D Models in email
In Outlook 2019 or newer, you can insert 3D models into an electronic mail message. To use this feature yous have to be using the total-sized bulletin editor. If y'all create a new email yous'll already be using information technology, but if you are replying to a message in the reading pane yous'll need to click Pop Out to expand the bulletin editor to full-size. Then y'all can become to the Insert tab and click 3D Models.
1 important matter to remember is that the other person won't exist able to edit the model you lot insert in the message. 3D models in emails are converted into pictures when sent, so the other person can't edit it.
Supported versions of macOS
3D models in Microsoft 365 for Mac or Part 2022 for Mac are supported on macOS version 10.12 and on macOS version 10.13.4 and later.
This feature isn't supported on macOS version 10.eleven and earlier. Information technology also isn't supported on macOS version 10.13.0 through 10.13.3. If y'all're running one of those versions, you'll need to upgrade to a newer 1 to use 3D.
Add 3D objects from a local file
You insert 3D models into your files much the same way as other images. On the Insert tab of the ribbon select 3D Models so From a File.

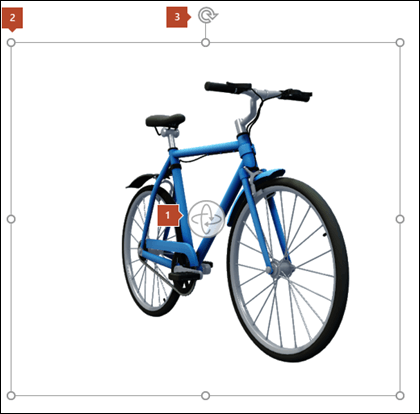
In one case it's inserted yous can use the controls to manipulate the image:
Use the 3D control to rotate or tilt your 3D model in whatsoever direction. Simply click, hold and drag with your mouse.
Drag the image handles in or out to make your epitome larger or smaller.
You can still use the rotation handle to rotate your paradigm clockwise or counter-clockwise, only y'all'll get a much better experience using the 3D rotation control we talked about above.
Add 3D Models from our online library
To select a 3D Model from our online library, choose 3D Models > From Online Sources. In the dialog box that appears you can scan, or search for, 3D images from the catalog.
Select one or more images and click Insert.
Change how your 3D models await in Role
When you insert a 3D model into your Office file you'll become a contextual tab on the ribbon nether 3D Model Tools called Format. On the format tab there are some handy controls to assist you customize how your 3D images are going to look.
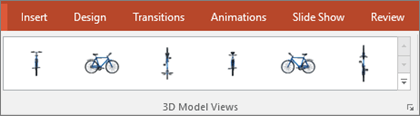
The 3D Model Views gallery gives you a drove of preset views that you tin employ on your image. For example you can rapidly select the head-on view or the top-down view.
If you lot've got multiple 3D models and you're having trouble selecting the i you want to work with, open up the Selection Pane to turn on the list of objects (Home tab > Arrange > Option Pane). And so you tin easily select the image or images that yous want to select.
The Marshal tool helps yous place your image on the page or slide—at the pinnacle or side, for example.
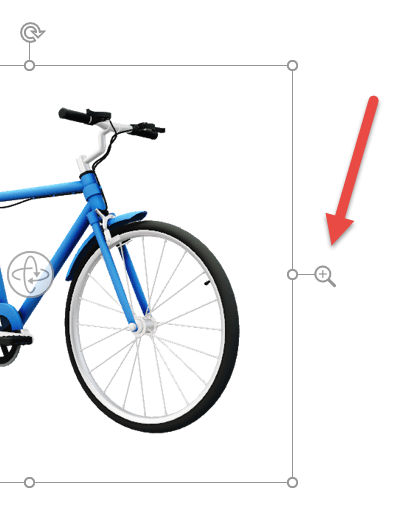
Pan & Zoom gives you control of how your 3D paradigm fits within the frame. Click the Pan & Zoom push, and then click and elevate the object within the frame to move it. Employ the Zoom arrow on the right-side of the frame to make the object announced larger or smaller within the frame.
In one case you lot have your 3D images inserted you can do all kinds of exciting things with them, such as using the Morph transition to make the object appear to rotate or spin.
Add together 3D models
To insert 3D models in Word, Excel, or PowerPoint for Windows Mobile go to the Insert tab of the ribbon and select 3D Models.

The pane will open. Select ane, or more, images and click Insert.
Change how your 3D models look in Office
Select any 3D model you've inserted in Role for Windows Mobile and you should see a 3D Model tab appear on the ribbon. Here you lot'll find tools that let you rotate your model a preset amount (yous can always just use your mouse to manually rotate it exactly the way yous want, if you prefer), or make other changes.
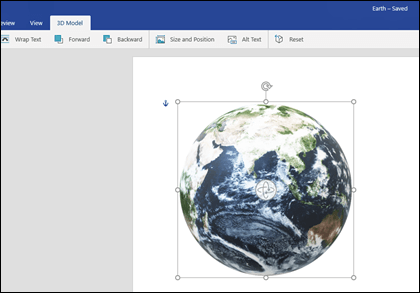
Some of the changes you tin can make include:
-
Wrap text controls how text volition flow around your 3D model on the page. Possibly you want your model to stand lone and for text to only be above or below information technology? Possibly you desire the 3D model to simply take part of the screen and for text to flow alongside it as well? This tool lets you lot make those choices.
-
Frontward or Backward allow you accommodate how other objects on the page announced with your 3D model. For case, if you wanted to add together an arrow shape and accept it appear on top of your model, pointing at something, y'all could send the 3D model astern and bring the arrow shape forward, and then that the arrow appears on acme of your 3D model. Frontwards and Backward let y'all have multiple layers of images or objects.
-
Size and Position requite you some tools that let you precisely resize your 3D model. If you need the 3D model to be exactly four.12 inches alpine that may exist hard to do by dragging the mouse, but in the Size and Position tool yous can blazon the exact height and width you want. You tin can as well use this tool to rotate your model, around whatsoever or all iii of the axes, to a precise degree.
-
Alt Text allows you to specify a brief text clarification of your 3D model for the benefit of people with visual impairments who rely on a screen reader to consume your file.
Later on you lot've made changes to your model you may determine that you want to undo the changes you lot made. The Reset button on the correct end of the 3D Model tab volition permit you lot put the model back the style it was earlier you started changing it.
mccleskeypreseved.blogspot.com
Source: https://support.microsoft.com/en-us/office/get-creative-with-3d-models-ec5feb79-b0af-47f6-a885-151fcc88ac0a
0 Response to "draw 3d rectangle in powerpoint"
Post a Comment